3D Candy Cane Text For The Holidays
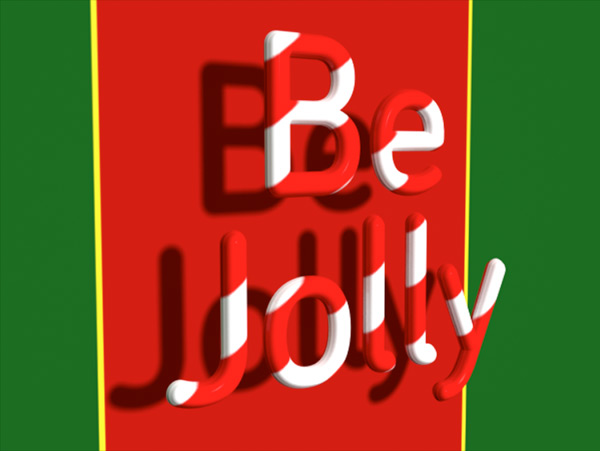
The holidays are here, and there’s no doubt that you will come across a few holiday-related design projects on your to-do list. Being able to create themed designs and artwork is part of the designer’s job description. Having the ability to create a wide variety of styles in your work makes you a versatile asset to any design firm. If you’re a freelancer, it makes it easier to market yourself when you have a wider range of skills. With the holiday season coming up, candy canes are going to be passed around everywhere. We’ll create 3D candy cane text to go with the tradition. Below is a preview of what we will be creating:
Create a new document within Photoshop CS6. I set the size to 1024px x 768px at 72ppi. We have to approach this project the right way from the start, so we have to think about the typeface that we choose to begin with. The typeface needs to be rounded, such as Arial Rounded, but the typeface I chose is Bariol Bold. The typeface is thick, and the ends are rounded, which makes for a smooth transformation into 3D. Type your holiday message and make it large enough to fill your canvas. Set the color to #7f7f7f, because it will be easier to see in 3D instead of black or white. The size of my type is 212pt with a leading value of 170.

Next, we need to convert our text to 3D, so go to “3D” > “New 3D Extrusion From Selected Layer.” The workspace will be converted into a 3D workspace. We will mainly be working in the 3D and the Properties Panels. The results when you first convert to 3D will be blocky and square, but with a few changes to the settings, we can fix this easily.

The way in which we approach our candy cane text in Photoshop will make all the difference. We will want to make the front and back faces rounded, while removing the extrusion, making the two semi circular faces (the front and back faces) meet up, making a perfectly cylindrical shape. This is fairly easy to do, you just have to know which settings to change to get the results that you want. Click on the layer in the 3D Panel with a “T” symbol and your message within it. This is the section where you can contort and manipulate the shape of your text within the 3D plane.
Continue

