
Being Aware of 3D in Illustrator
Illustrator is the go-to place for most illustrators to do their work. Many artists do their 2D work inside of Illustrator, and they create amazing results. Many artists and designers are aware of the fact that you can create 3D in Illustrator, but they aren’t sure how it works. Today, I will show you how to create 3D in Illustrator, and how it works. You can even create 3D type in Illustrator.
How 3D in Illustrator Works
You can start with any shape, even something as simple as a circle. Select the Ellipse Tool and draw a circle on the artboard. I gave it no stroke and made the fill black. You can fill it with any color that you want.

Next, go to Effect> 3D and select Revolve. A dialog box will come up. It is important to click the preview button in order to preview your settings. The box that comes up controls how your 3D object will look. The first 3 settings next to the cube will determine the positioning of the object. The icons tell you which direction each setting will tilt the object. If you like a more hands on, manual approach, then you can choose to click and drag the cube itself in any direction, and it will tilt in the direction that you pull it.
Perspective is a bit of an odd setting, because it distorts the perspective of your object and skews it at the angle that you specify. The angle will determine how far around your object will rotate. With our circle, it is rotated 360°, which will form a doughnut shape.

If we changed the 360° setting to 180°, the shape would look more like a macaroni noodle. In this instance, the Cap setting doesn’t do anything, because the two ends meet, but if we had set the angle to 180° and had created the macaroni shape, then we could set the cap to either be filled and closed off, or hollow, as in the second option.
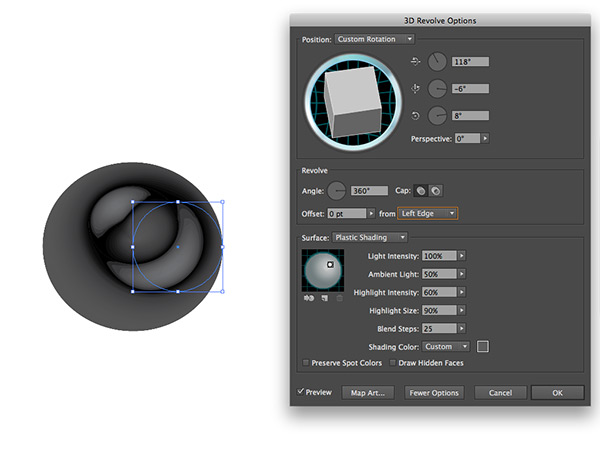
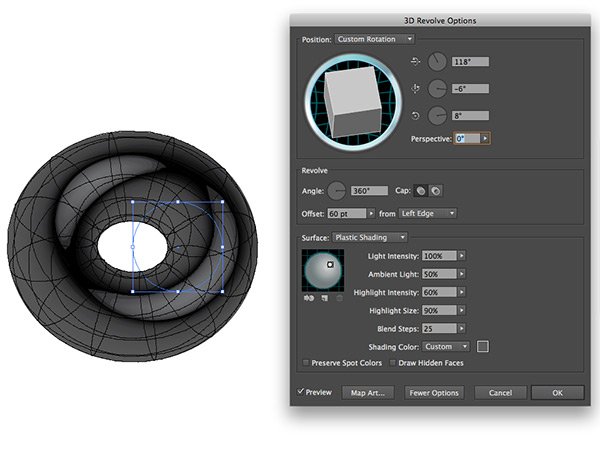
Offset is an important setting. Offset determines how far the circle rotates away from itself. In other words, the default setting is 0pt, which means that there would be no hole in our doughnut, but when we set the Offset value to 60pt, we created an easily visible hole in the middle.

If you click the More Options button, you can select the surface of your object. You can use the default, which is plastic shading, and the one I prefer, or you can use diffuse shading, no shading, and wireframe. I don’t care for diffuse shading and no shading, because they aren’t easy to work with in 3D. It isn’t easy to judge what your final outcome will be with shading turned off. Wireframe is great for creating technical illustrations, or adding a technical element to your design. This is one of the lesser known features of working with 3D in Illustrator.

If you select Plastic shading, you’ll open up a wealth of different settings to shade your object just how you want. Light intensity will make the object brighter, and since it is plastic, it will look shinier.
Ambient light is a little tricky, though. It works oddly with the shading color, and actually works counter-intuitively. If you set ambient light to 100%, then the shading color won’t show up. The lower the percentage that you set ambient light to, it will make the shading color more intense.
Highlight intensity will control how bright the shine will be on your 3D object. This works with Highlight Size to make the shine larger. This will make your object look shinier and give it a glossier look.
Blend Steps is an important setting, because you will find that sometimes you will see color banding in your shapes. This is due to the fact that you don’t have enough blend steps to smooth out the gradual blend of shading. All you need to do to get rid of banding in your 3D objects is to increase the blend steps. Keep in mind that the more blend steps that you have, you will be making Illustrator work harder, eating up more RAM and processing power.
Conclusion to 3D in Illustrator
You can create beautiful 3D in Illustrator easily. It just takes knowing the settings and how to control what your object looks like in 3D. You can literally create a 3D object from any 2D object with Illustrator’s 3D settings. Create technical illustrations using wireframes, or create glossy 3D objects. Either way, you have a lot of 3D capabilities built right into Illustrator.
What has your experience been working with 3D in Illustrator? Have you created some beautiful 3D artwork? If so, share it with us via the comments section below.

